
Tutorial: Venus earring
This is a christmas angel ornament. It is very cute and it can be made in different variations with changing the pattern.
First you make the body going down from the head, then you make the wings. When knotting the wings, you have to start from the head.
As you add the cords: the first 2 on the left and the first 2 on the right should be added as 1/3 of the cord goes for the wing and 2/3 of the cord for the body. Then 2-2 cords are added in half. Then again 2 on the left and 2 on the right should be added as 1/3 of the cord goes for the wing and 2/3 of the cord for the body.
I used white shoe making polyester cord.
There is an other version of angel here, with a little different pattern 🙂
I hope you like it and you can use it.

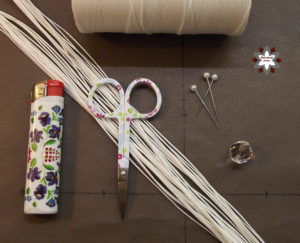
Used materials:
- 1 x 1,5cm bead for the angel’s head;
- 21 x 65cm waxed polyester cord (1mm)
You will also need:
- a workboard (mine is a covered swimming board);
- scissors;
- pins;
- and a lighter.
Click on the first thumbnail and you can click the left/right arrows to the previous/next step:
Merry Christmas! 😀
Related posts


Hello, tha k you for sharing pattern and pictures. One things is unclear, and I came to a problem. How long you leave the cord for wing and how long for the body. Since your tutorial didnt mention or show anything, every time I added new cord I added it half way e.g half is going down half is for the wing. But I have left not enough cord for the body to finish… I have to re-do it… such a shame….
Hello,
Oh I am very sorry about that. I really forgot to mention it in the description and it is very important.
The length given in the used materials is ok, please add the cords for the wings: third of it (1/3) should be for the wing.
I am sorry you had problems because of it, I compliment the description immediately.
Thank you!